Create the Hair: Antonio Marras Spring Summer 2012

Create the Hair: Antonio Marras Spring Summer 2012
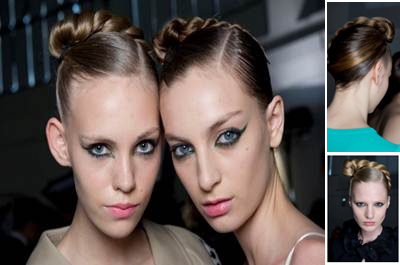
The Look: Oui Madame!
The S/S '12 Antonio Marras collection featured a bold and eclectic mix of palettes, prints and textures, inspired by the distinct and controversial style of early 20th Century French female artist, photographer and writer, Claude Cahun. This inspiration was developed to create the character of a maid, secretly experimenting with her madame's wardrobe; the romantic mix of soft, feminine florals and pretty graphic prints married with neat, uniform-like silhouettes, capturing the subtleties of their different roles.
The hair look created by Eugene Souleiman, Global Creative Director, Wella Professionals, Care and Styling, brought to life both facets of these characters: 'I was inspired by a moodboard of Claude Cahun that Antonio had created which had pictures of her wearing a hat made from twisted fabric. I wanted to recreate this effect with hair to make a small but striking hair look which was sculpted and intricate, a mix of strict discipline with ephemeral beauty. I liked the idea of using the hair to capture the more stern and confident side of the maid's character, in contrast with the softness of the madame's clothes." said Eugene.
To create the look, Eugene manipulated the hair into an almost fabric condition, wrapping it neatly around the head to create a smooth vinyl-like sheen, before crowning the head with a sculptural, tiara-style rope twist.
Get the Look:
Step 1: Prepare
The right preparation is absolutely essential for this look in order to achieve the quality of hair needed to create the style. Start with freshly washed and conditioned hair using Wella Professionals Enrich Shampoo and Conditioner, and apply Wella Professionals Velvet Amplifier to wet hair before blow drying hair straight and smooth using a round brush, without creating volume. For hair in need of an extra moisturising boost, like that of models at Fashion Week, try using Wella Professionals Enrich Moisturising Treatment once a week.
Step 2: Sectioning – Part 1
Use a sectioning comb to create a razor sharp side-parting, all the way back to the crown. Take the section of hair from the large side of the parting on the top of the head (leaving the small side below the parting and the back for the head from the crown free) and spray with Wella Professionals Flexible Finish Spray at the roots of the hair until the hair is absolutely wet , then brush through creating tension in the hair and secure tightly into a pony tail high on the side of the head using a snag free elastic. Spray the pony tail with Wella Professionals Shimmer Delight to create a shine and even texture to the pony tail.
Step 3: Sectioning – Part 2
Take the remaining hair from the side of the parting and the back of the head and saturate the roots with hair spray and brush through with a soft bristle brush. Pull the hair toward the high pony tail and create a second pony tail just below the high one, then bind the two pony tails together with snag free elastic. Spray Shimmer Delight spray into the ponytail. Ensure that the hair on the back and side of the head is clean and shiny, and wraps around the head as if wrapping the head in a piece of silk fabric.
Step 4: Rope Twist – Part 1
Divide the ponytail into two equal sections and twist each section individually before wrapping them around each other along the full length to create a rope-like braid, spraying generously as you go. Secure the end tightly with a snag free elastic.
Step 5: Rope Twist – Part 2
Next pull the rope twist over the top of the head, creating a tiara-like sculpture. Pull the end of the twist diagonally down to the nape of the neck, finishing on the opposite side to the top knot of the rope. Using hair pins, pin the rope twist into place. Soak the end of ponytail with Wella Professionals Sculpt Force Flubber Gel and tease the hair to blend perfectly with the hair at the back of the head for a seamless finish.
Products
Wella Professionals Enrich Shampoo
Wella Professionals Enrich Conditioner
Wella Professionals Velvet Amplifier
Wella Professionals Flexible Finish Hairspray
Wella Professionals Sculpt Force Flubber Gel
MORE


